
Claude Code's agent teams feature lets you run multiple Claude Code instances in parallel, coordinated by a single lead session. One agent handles the backend, another takes the frontend, a third runs tests. They share a task list, message each other directly, and work through problems simultaneously instead of sequentially.
This is the Claude Code feature we have been most excited about. Not because it replaces purpose-built multi-agent orchestration frameworks (it does not, and we do not think it is trying to), but because it solves a real problem we hit constantly: context window management. When you are deep in a complex task with a single Claude Code session, the context fills up fast. Tool calls, file contents, conversation history, all of it competes for the same window. Agent teams let you break work into focused tasks where each teammate gets a fresh context dedicated to its piece of the problem. That is a meaningful shift in how much you can get done in a single sitting. If you are already comfortable with Claude Code's power-user workflows, teams are a natural next step.
The feature is experimental and disabled by default. Getting it running is straightforward, but there are a few configuration steps and terminal concepts that trip people up on the first attempt. This guide walks through the full setup on macOS using iTerm2 and tmux, from enabling the Python API to managing your first multi-agent session.
Prerequisites
Before you start, you need three things installed on your Mac.
iTerm2 is your terminal. Agent teams spawn split panes for each teammate, and iTerm2 handles this natively when configured with tmux's control mode. The built-in macOS Terminal and VS Code's integrated terminal do not support split-pane mode for agent teams.
tmux is the terminal multiplexer that manages panes behind the scenes. Install it with Homebrew if you have not already:
brew install tmuxClaude Code v2.1.32 should be installed and working. If you can run claude in your terminal and get a session, you are good.
Step 1: Enable the iTerm2 Python API
Claude Code can use iTerm2's native pane splitting instead of raw tmux, but it needs the Python API enabled to do so. This is a one-time configuration change.
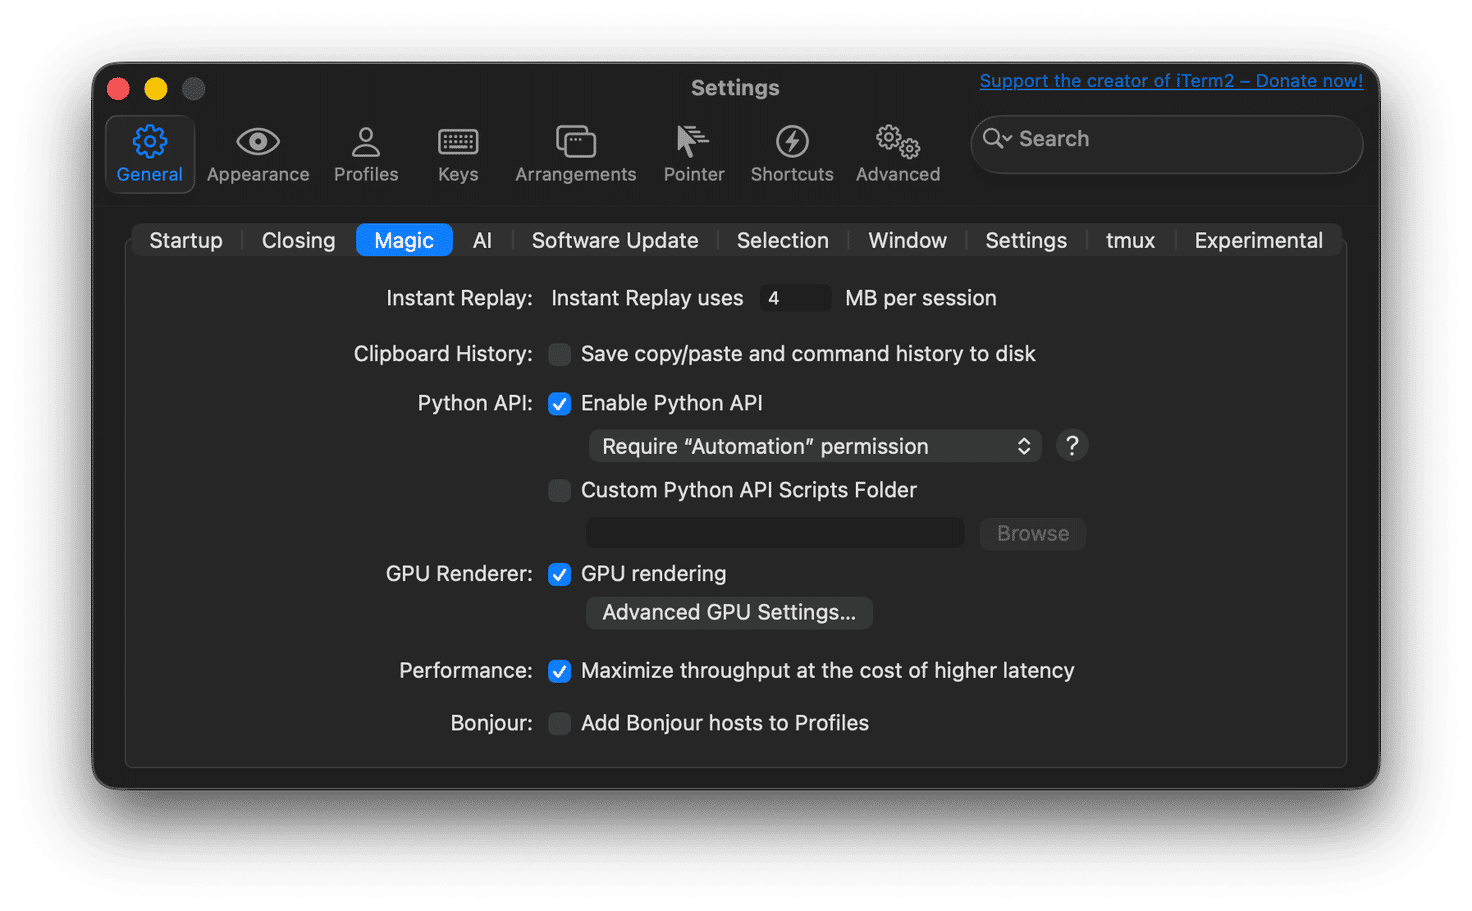
Open iTerm2 and navigate to Settings (or press Cmd + ,). Go to General, then the Magic tab. Check the box labeled Enable Python API. iTerm2 will show a warning about what the API can do. Accept it.
That is it. The Python API allows Claude Code to programmatically create and manage split panes when spawning teammates. Without it, Claude Code falls back to raw tmux panes, which work but lack iTerm2's native tab and window integration.
Step 2: Verify tmux Is Working
Open iTerm2 and run a quick sanity check:
which tmux
tmux -V
If which tmux returns a path and (typically /opt/homebrew/bin/tmux on Apple Silicon Macs), you are ready.
Step 3: Configure Claude Code for Agent Teams
Agent teams are behind an experimental feature flag. You need to enable the flag and configure the teammate display mode. Open your Claude Code settings file:
# Open the settings file
vim ~/.claude/settings.json
Add the environment variable and teammate mode configuration:
{
  "env": {
    "CLAUDE_CODE_EXPERIMENTAL_AGENT_TEAMS": "1"
  },
  "teammateMode": "tmux"
}
The teammateMode setting controls how teammates render. There are three options:
- "auto" (the default) detects your environment. If you are already inside a tmux session, it uses split panes. Otherwise, it falls back to in-process mode where all teammates share one terminal window.
- "tmux" forces split-pane mode. Each teammate gets its own pane. This is what we want because it lets you see all agents working simultaneously and click into any pane to interact directly.
- "in-process" runs everything in a single terminal. You navigate between teammates with keyboard shortcuts. This works in any terminal but makes it harder to monitor multiple agents at once.
One important detail: teammates inherit the lead session's permission settings. If you have restrictive permissions configured, teammates will stall on permission prompts with nobody to approve them. You can pre-approve common operations by adding an allowlist to your settings:
{
  "env": {
    "CLAUDE_CODE_EXPERIMENTAL_AGENT_TEAMS": "1"
  },
  "teammateMode": "tmux",
  "permissions": {
    "allow": [
      "Bash(ls:*)",
      "Bash(grep:*)",
      "Bash(git status:*)",
      "Bash(git diff:*)",
      "Bash(git log:*)",
      "Bash(mkdir:*)",
      "Edit(*)",
      "Write(*)",
      "WebFetch"
    ],
    "deny": [
      "Bash(git push --force:*)",
      "Bash(git reset --hard:*)"
    ]
  }
}
Tailor the allow and deny lists to your workflow. The principle is simple: pre-approve anything a teammate would need to do their job, and deny anything destructive.
Step 4: Start tmux, then Claude Code
The launch sequence matters. You need to start inside a tmux session first so that Claude Code detects it and uses split panes for teammates.
Open iTerm2 and start a tmux session using control mode:
# Navigate to your project directory first
cd ~/your-project

# Start tmux in control mode (the -CC flag is key for iTerm2)
tmux -CC new-session -s agents
The -CC flag is important. It enables tmux's control mode, which allows iTerm2 to map tmux panes to native iTerm2 panes and tabs. Without it, you get raw tmux rendering, which works but is not as clean to navigate.
You should see iTerm2 open a new window or tab managed by tmux. Now launch Claude Code inside this session. Claude Code will detect that it is running inside tmux and use split panes when spawning teammates.
Step 5: Test Agent Teams
With Claude Code running inside your tmux session, give it a prompt that exercises team coordination. This example, while simple, requires no existing project or dependencies. It creates everything from scratch, so you can run it in an empty directory to verify that teammates spawn, communicate, and report back correctly:
Create an agent team with three teammates to build a self-contained
data pipeline. No external APIs or libraries needed, just Python 3,
which ships with macOS.

- Teammate 1 (Generate and Transform): Write a Python script called
  generate_data.py that creates a realistic dataset of 200 fictional
  company records. Each record should have: company name, industry
  (pick from 8-10 categories), founding year (1950-2024), employee
  count, annual revenue in USD, and headquarters country. Use
  Python's random module with a fixed seed for reproducibility. Save
  the raw data to raw_data.json. Then write transform.py that reads
  raw_data.json, cleans it (remove any with revenue under 100k),
  adds a computed "revenue per employee" field, and categorizes each
  company as Startup/SMB/Mid-Market/Enterprise based on employee
  count thresholds. Save the result to clean_data.json.

- Teammate 2 (Analyze): Write analyze.py that reads clean_data.json
  and computes: total companies per industry, average revenue per
  industry, the top 10 companies by revenue, distribution of company
  sizes (Startup/SMB/Mid-Market/Enterprise), average company age by
  industry, and the three countries with the most headquarters.
  Output everything to analysis.json.

- Teammate 3 (Report): Write build_report.py that reads
  analysis.json and clean_data.json and generates report.html. The
  report should include: a dashboard header with summary stats, a
  styled table of the top 10 companies, a horizontal bar chart of
  revenue by industry using only inline CSS (no JavaScript
  libraries), a breakdown table of company size distribution, and a
  footer with generation timestamp. The HTML should look presentable
  when opened in a browser.

The lead should coordinate the JSON schema between stages so each
script's output matches the next script's expected input. After all
three teammates finish, the lead should run the full pipeline in
sequence (generate, transform, analyze, report) and confirm
report.html opens correctly.
If everything is configured correctly, you will see Claude Code create a team, spawn three teammate panes in your tmux session, and assign each one its stage of the pipeline. The teammates work independently in their own context windows. The lead coordinates to make sure the JSON schema between stages is consistent, then runs the full pipeline end to end and confirms that report.html opens in a browser with formatted data.
This prompt works well as a test because it exercises every aspect of agent teams: parallel work across multiple files, a shared data contract that requires coordination, and a final integration step the lead owns. It has zero external dependencies. Everything runs with the Python 3 that ships on macOS.
If teammates are not appearing in separate panes, verify that you started Claude Code inside a tmux session (check for the tmux status bar or run echo $TMUX to confirm). If teammates stall on permission prompts, revisit the permissions allowlist in your settings.
Agent Team Controls Cheat Sheet
Once your team is running, you need to know how to monitor and interact with agents. The controls differ depending on whether you are using split-pane mode or in-process mode.
Split-Pane Mode (tmux)
In split-pane mode, each teammate is a full Claude Code session in its own pane. You interact with them directly.
| Action | How |
|---|---|
| Focus a teammate | Click into its pane |
| Message a teammate directly | Click its pane and type |
| Return to the lead | Click the lead's pane |
In-Process Mode
If you are running in-process mode (all teammates in one terminal), these keyboard shortcuts control navigation:
| Shortcut | Action |
|---|---|
Shift + Up/Down | Cycle through teammates. Once selected, type to send a message. |
Enter | View the selected teammate's full session history |
Escape | Interrupt the selected teammate's current turn |
Ctrl + T | Toggle the shared task list |
Team Management
| Action | How |
|---|---|
| Enable delegate mode | Shift + Tab restricts the lead to coordination only. Prevents it from doing the work itself instead of delegating. |
| Force the lead to wait | Tell the lead: "Wait for all teammates to complete their tasks before synthesizing results." |
| Nudge a stuck task | Check if the work is done, then tell the lead to update the task status or nudge the teammate. |
| Shut down the team | Tell the lead to shut down teammates first, then clean up. Always use the lead for cleanup. |
tmux Guide for iTerm2
tmux is the layer that makes split panes work, but its keyboard shortcuts are not intuitive if you have never used it before. Here is what you need to know to stay in control of your agent team sessions. All tmux commands start with a prefix key, which by default is Ctrl + B. You press the prefix, release it, then press the command key. In iTerm2 with control mode (-CC), you can also click panes and drag dividers directly.
Pane Navigation
| Shortcut | Action |
|---|---|
Ctrl + B, arrow key | Move focus to the pane in that direction |
Ctrl + B, q | Flash pane numbers, then press a number to jump to it |
Ctrl + B, o | Cycle to the next pane |
| Click on a pane | Focus it (iTerm2 control mode only) |
Resizing Panes
| Shortcut | Action |
|---|---|
Ctrl + B, hold Ctrl + arrow key | Resize the current pane in that direction |
Ctrl + B, z | Zoom pane to full screen (press again to unzoom) |
Ctrl + B, Space | Cycle through layout arrangements (tiled, even-horizontal, etc.) |
| Drag the divider | Resize panes with your mouse (iTerm2 control mode only) |
tmux select-layout tiled | Rebalance all panes to equal sizes (run from any pane) |
Closing Panes
| Shortcut | Action |
|---|---|
Ctrl + B, x | Close the current pane (confirms first) |
Type exit | Close the pane's shell |
Session Management
Agent teams sometimes leave orphaned tmux sessions. These commands help you find and clean them up. You can run them from any terminal, inside or outside tmux.
| Command | Action |
|---|---|
tmux list-sessions | List all active tmux sessions |
tmux kill-session -t agents | Kill a specific session by name |
tmux kill-server | Kill all tmux sessions (nuclear option) |
tmux attach -t agents | Reattach to a detached session |
tmux -CC attach -t agents | Reattach with iTerm2 control mode |
Ctrl + B, d | Detach from session without killing it (agents keep running) |
Other Useful Commands
| Shortcut | Action |
|---|---|
Ctrl + B, [ | Enter scroll mode. Use arrow keys or Page Up/Down to scroll. Press q to exit. |
Scroll mode is essential for reading long teammate output that has scrolled past the visible area of a pane.
When Agent Teams Are Worth It
Agent teams add coordination overhead and use significantly more tokens than a single session. Each teammate is a full Claude Code instance with its own context window. The math is straightforward: more agents means more tokens means more cost.
They work best when teammates can operate independently on separate concerns. Research tasks where multiple agents investigate different aspects simultaneously. New features where each teammate owns a different module. Debugging sessions where agents test competing hypotheses in parallel. Cross-layer changes that span frontend, backend, and tests, each owned by a different agent.
For sequential tasks, same-file edits, or work with many dependencies between steps, a single session or subagents are more effective and cheaper. Start with a single session. Only reach for teams when the task is genuinely parallelizable and the coordination benefit justifies the token cost.
Tips from Real Usage
- Keep teams small. Two to four teammates is the sweet spot. Larger teams increase coordination overhead and token burn without proportional gains.
- Use delegate mode early. Press Shift + Tab after starting a team. Without it, the lead often tries to do the work itself instead of delegating to teammates.
- Be specific in your prompt. "Build me an app" will burn tokens while agents flounder. "Implement these three clearly defined API endpoints according to this specification" produces good results. Define clear boundaries, specific files or modules each agent owns, and an explicit output format.
- Use CLAUDE.md for shared context. Teammates read
CLAUDE.mdfiles from their working directory. Put project-specific guidance, conventions, and constraints there so every teammate picks them up automatically. - Monitor your token usage. Run
/usagein Claude Code to check your weekly limits. A three-agent team analyzing a codebase can eat through a significant chunk of your quota in a single run. If you are on a plan with usage caps, plan your team sessions accordingly. - Assign models by role. Not every teammate needs the most expensive model. Use Opus for the lead and complex reasoning tasks, Sonnet for routine implementation, and Haiku for lightweight tasks like documentation review.
Agent teams are still experimental, and the rough edges show. Sessions occasionally need manual nudging, shutdown can be slow, and there is no way to resume a team after a session restart. But when the task fits the pattern, parallel agents coordinating on a shared problem can compress hours of sequential work into minutes.
If you are building with Claude Code or integrating AI agents into your development workflow, we can help. Learn more about our AI and ML services or get in touch to talk about your project.

